Posted on 20/08/2022 15:04:20
I recently installed ntfy to enable UnifiedPush on several apps on my phone in order to conserve battery life and make notifications work more real-time. That gave me the idea that I can use this same setup for creating SSH intrusion alerts for my server for that extra peace of mind.
Installing it is quite straightforward. You can find guide for installing it on their website. In my instance, I had to install it for Ubuntu, so following commands had to be executed:
curl -sSL https://archive.heckel.io/apt/pubkey.txt | sudo apt-key add -
sudo apt install apt-transport-https
sudo sh -c "echo 'deb [arch=amd64] https://archive.heckel.io/apt debian main' \
    > /etc/apt/sources.list.d/archive.heckel.io.list"
sudo apt update
sudo apt install ntfy
sudo systemctl enable ntfy
sudo systemctl start ntfy
Now this enables anonymous access and everything to your server. That is cool and all if you wish to offer this for public, but it comes with its own reprecussions. I wished to keep my instance private just to eliminate interference with my own alerts and also have more trust in the system. You do not want to deal with phishers using YOUR instance or bad actors to derail you with false alerts.
In order to privatize your instance, you need to open /etc/ntfy/server.yml and edit the following:
auth-file: "/var/lib/ntfy/user.db"
auth-default-access: "deny-all"
This leaves you with a bare setup and may not fully suit your previously installed services. In my case I had to create a reverse-proxy for it. You can find the template for your preferred webserver in their docs. One thing to keep in mind though with their nginx template, is that you will need to add IPv6 listener manually should you use IPv6 on your server as it’s absent. Generate an SSL certificate using certbot and nginx plugin.
Edit your configuration again as follows:
base-url: https://<your based domain or subdomain>
listen-http: "127.0.0.1:2586" # can be your preferred port too.
behind-proxy: true # only if reverse-proxy. otherwise false, listen-http to 0.0.0.0 and provide ssl certs as well in config.

# optionally enable cache incase your push notif receivers go offline for prolonged time.
cache-file: /var/cache/ntfy/cache.db
cache-duration: "12h"
If you are also using Debian or Ubuntu, run systemctl restart ntfy. You should
now have a private instance of ntfy provided your reverse proxy worked out.
Next up you should create an admin account for your administrative needs with
ntfy user add --role admin <youradminuser>. Use this when necessary.
You should also create your own user with ntfy user add <user>.
In order to make your instance UnifiedPush compatible, you need to give world
access to write to service URLs with ntfy access everyone 'up*' write-only.
Now you can give permissions for yourself as well - you can be generous here and
give read-write to everything with ntfy access <user> '*' read-write.
By now everything should be functioning as intended and your instance is compatible with UnifiedPush and you can start receiving notifications through it.
Install the ntfy mobile app from F-Droid or your preferred application library. Go to settings of the app, add user pointing to your instance with credentials of your previously created user.
Subscribe with your device to a new topic on your instance, I used “sysalerts” myself.
Next up, create a new monitor user on your server: ntfy user add monitor.
Give it permission to your ssh alerts topic. ntfy access monitor 'sysalerts' write-only.
Create a script file in world-accessible path called “ssh_login.sh”. Paste the following and modify according to your setup:
#!/bin/bash
MONITOR="monitor:password"
CURTIME=$(date)
INSTANCE="your.based.server"
TOPIC="sysalerts"
if [ "$PAM_TYPE" != "close_session" ]; then
if [ "$PAM_USER" == "git" ]; then
exit 0
fi
ntfy publish \
-u "$MONITOR" \
--tags warning \
--title "Successful SSH authentication" \
"$INSTANCE/$TOPIC" \
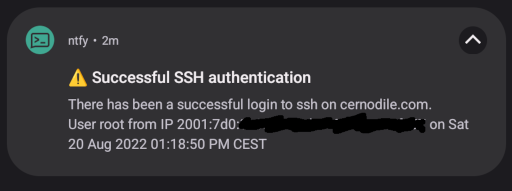
"There has been a successful login to ssh on cernodile.com.
User $PAM_USER from IP $PAM_RHOST on $CURTIME"
fi
Make it world-executable chmod ugo+x ssh_login.sh and edit /etc/pam.d/sshd.
Append the following line to it: session optional pam_exec.so seteuid /path/to/ssh_login.sh.
This will make the script be run every single time someone authenticates through SSH and also not block login if the script is absent.
Just to be sure, keep your current SSH session and alive and try opening a second one. If everything is done correctly, you should have a notification on your phone (or desktop if you subscribed on it as well).
I understand this may not be a fully elegant solution and there can be security implications here. I am open to improving this solution, a healthy dialogue is encouraged on the topic. So far this has been working without an issue. You can easily set it up with a public provider too (ntfy themselves have a public instance!), but that would defeat the purpose of being a landchad.
The alert looks something like this (img size 33K)
Thanks for reading,
Join us at Matrix: #based-quest:cernodile.com
© 2021 - 2024 based.quest | Powered by Hugo | Donate | Atom RSS